It's the honest truth, motherhood is a hard job. It's also a very rewarding job. With that said, I want to share a bit about my experience, so far, with being a mother.
I constantly feel like I give, give, give all day long. You get up in the morning to your sweet little kids who are hungry, so you feed them. Then they need to get dressed, so you strip them down and then clothe them again. Then come the daily chores and tasks. You do the laundry, clean the kitchen after breakfast, make the bed, all the while still entertaining the little ones. Before you know it, it's lunch time! Off you go to the kitchen to make lunch. Then you clean it all up a bit later and then nap time. And instead of sitting down, sipping some Diet Coke and watching Grey's Anatomy, you pick up the toys, dust the furniture, clean the bathroom, and tidy up the house just in time for the kids to wake up and it starts all over again. Here's what I'm getting at...where's the ME time?
After I had my first child, my life felt a bit like that. I was exhausted constantly. I never got ready for the day until a few minutes before my husband got home. My house was always clean but I was always a wreck. It wasn't until I had my second baby that I finally realized things had to change. I was doing everything for my kids that I never made time for myself. I came last in taking care of everyone and everything else. Well, I'm here to tell you that it's possible to be a great mom and still be a great YOU!!!
I was having a bad day. You know the days when the kids are misbehaving, you have a headache, the house is a mess, and well so are you. When nap time hit I gave up. I'm pretty sure I even texted my husband that I was done. I had thrown in the towel. I was bitter towards my kids and I was spent...in every way! So I sat on my bed in tears and scrolled through Instagram. Ha...I know pathetic. But, I came across some wonderful people's feeds that day that really changed my perspective.
Alison Faulkner (@thealisonshow) is a hoot. She is through and through 100% herself, and I admire that. In a day when everyone is comparing themselves to the person next to them or to a complete stranger on social media, she's been able to keep it real. It's so refreshing to see someone embrace their uniqueness for everyone to see. And it wasn't until I came across her feed that I realized that I had truly lost who I was. I used to be silly, fun, outgoing, and project oriented and I had turned into a hermit crab! Why had I let myself go? Oh yeah, I remember, I thought that because I was a mom...that was who I was. I was now depicted as the unfashionable, 'stay-at-home-mom', who makes paper crafts all day and never puts on makeup. Well, that wasn't me. Don't get me wrong...I like to think that I'm pretty domestic, but did I really want that to completely define me? Did I want people to introduce me as, 'This is Allie, she's boring as hell'...um NO!!!! So, I got with it! It's not like I changed overnight, but I did make a conciouse effort to get ready, put on makeup, make plans with my girlfriends, and take time for myself.
Then I came across Meg Conley (@meg_in_progress)! Seriously, she needs to write a book. Her words paint pictures. But anyway, as I scrolled through her feed I noticed something. She's honest about motherhood. She's not sugar coating anything. She'll tell you when it's been a hard day as a mom, and she'll tell you when it's been a joyous day. We need more people like that. More people who are okay with saying that kids throw tantrums, but then give kisses after and that's it's not out of the norm to want to hide in your bathroom and eat ice cream. We've all been there...amiright? She's and inspiration to me to not be afraid to be honest with others and with myself. I'm doing a good job as a mom! My kids are alive, thye love me, and most of the time they are happy happy happy!
Lastly, Haley Kjar (@haleykjar). This girl knows how to take some amazing pictures. It also helps that her kids are adorable, but her feed is about her family. I sat on my bed with tears running down my cheeks looking at her perspective on motherhood. She's got a gift of seeing the GOOD in being a mother. Because of her outlook, I find myself more often than not, looking at moments with my kids differently. I more easily can see how they're feeling. I try and pick out the special moments with them I know I'll never have again. I recognize more that they are growing up, and before I know it they'll be married and have their own little ones.
These three ladies, and many others, have helped me to realize something...I can balance it all. There's a way to still be yourself and be a great mom. By loving who I am I can more easily love my little ones. I love the quote, 'Taking care of yourself is part of taking care of your kids'. It sounds selfish to say that we must first take care of ourselves but when you really think about it if we fade away, if we are unhappy and don't love who we are, how on Earth are we supposed to love those little ones who are a piece of us? I can tell you that since taking more time for myself I put more effort into my kids. I take more time to snuggle and kiss them, and I enjoy their company so much more.
All in all, I LOVE being a mother! Sometimes it takes time to find peace and patients in the chaos that's brought on by the gift of motherhood, but it's just that...it's a gift. I feel so thankful to wonderful ladies who share their honesty, pictures inside their daily lives, and their thoughts and words on motherhood. You may not feel like you're making a difference, but trust me you are. I'm working everyday to find balance in being a great mother and being a great me.
Friday, September 12, 2014
Wednesday, September 10, 2014
Remee's 3 Year Photobook
As many of you know, I make a photo book for my kids every year using Shutterfly. I've fallen a bit behind on making them so when I saw a free photo book code on Facebook, I jumped on the bandwagon and got going on Remee's 3 year book. Take a look and get on the bandwagon too. Get a free 20 page photo book from Shutterfly using code BOOK4FREE!
Shutterfly photo books are the new way to preserve your memories. Create your own today.
Friday, August 15, 2014
Diy Shark T-shirt

A plain colored t-shirt (I got mine from Forever 21 cause they are only $3.90!!)
A bleach pen
a square piece of cardboard
a rag to dab your bleach pen on if needed

First things first, find an image of a shark you'd like to replicate. If you're feeling really artsy, go for one that's a bit more intricate. I chose something simple!

Next you'll want to place the piece of cardboard inside the shirt so that when you're painting with your bleach pen it won't bleed through the back of your shirt.


Using the small side of the bleach pen, draw your design. Remember this doesn't have to be perfect!! After it's washed the lines will look a bit tie-dyed so imperfections are A-Okay!


Now that your image has been drawn, go back over the lines with your bleach pen as to rub in the bleach a bit. No bleach should be coming out of the bleach pen at this point, this is just to make sure that the bleach is penetrating the fabric. Let the design sit on your fabric for 10 minutes(or longer if you want it lighter) and then rinse with water thoroughly. I put mine through the wash.
If you are using a shirt from Forever 21 please keep in mind that their shirts shrink A LOT if dried. I never put mine in the dryer. Let it air dry completely... and... voila! You've got yourself a sharky shirt for under $5.00!!! Winning!!!

Tuesday, August 12, 2014
DIY Shrink Shark Necklace

I realize I'm a bit of a weirdo in that fact that I just made a shark necklace in honor of Shark Week, but any excuse for me to craft is a good excuse. Just this past Father's Day I got into Shrink Film to make some adorable tie clips for my hubby from the girls. They turned out way too cute for words, so I thought, why not use this stuff to make some necklaces? Well, it's been a few months and the thought came to me to make a shark necklace out of it. Genius right? I loved how it turned out, and I really love how festive it makes me feel during Shark Week!! Here's what you'll need to make one.
Shrink Film (I used matte, but clear or colored would work too)
A free clip art image of a shark (you will only be using the outline, so when choosing one, look for the outline that you like) The one I used is here.
A hole punch of some kind. Use a normal sized hole punch!
Sharpie
Scissors
Spray paint
Necklace chain (these come in so many different colors and sizes. I bought mine at JoAnns and it was only $2.99 for a 42" long chain)
Necklace Clasp (you'll need one)
Jump rings (you'll need three total)
parchment paper


Friday, August 8, 2014
Breastfeeding...my story
There was never a question for me when it came to breastfeeding my babies. I knew I was going to breastfeed even before my kids were conceived. I would see mothers covering up to breastfeed out in public and thought, "rock on stranger!" Everyone always made it look so easy, and truly, if it's what we are made to do it can't be that hard right? Boy was that a lie.
 Here's the thing...when I was pregnant with my first baby, all I ever heard about was childbirth. Everyone would go on and on about how painful it was, how tiring it is, and how they HATED it. But no one EVER talked about breastfeeding! So, when it came time to breastfeed my first thought was how wonderful it will be. And to be honest, the FIRST time is nothing compared to what happens next!
So here I am, on National Breastfeeding Week, to talk about the ins and outs of breastfeeding. It's the natural thing to do and yet so many women out there know nothing about it!
My story starts with, of course, my first child. I was prepared beyond what any first time mother should be when it came to child birth. I had taken Hypnobirthing classes months before I needed to so that I could practice all the techniques. Little did I know I would need to get induced after being a week late and in labor with contractions 4 minutes a part and not dilating. Labor didn't go how I wanted it to go, but it was perfect in the end. My little baby girl was born a whopping 8 pounds 5 ounces and was so perfect! They placed her up on my chest while they cleaned her up and the first thing I did was stick her on my boob. I was on such a natural high that I didn't feel anything! I was just so in love with my little girl.
A few hours later, it was feeding time again. My baby was fussy for the first time since being born and I pulled open my gown and stuck her on. OUCH!!!! What the heck was going on? I pulled her off and repositioned her. OUCH!!!! Am I doing something wrong? My mom came to my side to try and help. It's amazing to me that when you're trying to feed your baby, all modesty goes out the window. There I was on my hospital bed with my gown down to my waist, both boobs exposed, trying to get my nipple in my baby's mouth the right way. Motherhood is so glamorous! My sweet little baby was hungry and all I wanted to do was give her what she wanted, but keep myself from hurting. I had heard over and over from book to book I had read before my baby was born that, 'nursing shouldn't hurt, and if it is hurting, your doing something wrong.' Well, I was in pain, and no matter what I did, nursing hurt! The next day I had the lactation specialist come in and watch how I was nursing. With her help I was able to get my baby to nurse correctly...but it still hurt. So, she stuck her finger in my baby's mouth and came to a conclusion. Baby girl was a chomper. Instead of sucking like a normal baby, she chewed when she ate, therefore, hacking away at my nipple. Devastating news for a new mommy in pain, but she reassured me that if I stuck with it, my little girl would get the hang of it and start to suck instead of chew. Sure enough, she was right! A few days after my little one was born my milk finally came in and thus began the sucking!!! Yay!!!
Now, I'm not saying that once my milk came in that the pain went away. Oh no, the pain lasted a good 3-4 weeks before I was able to nurse without my toes curling in pain. Nursing became a wonderful experience for me. I looked forward to holding my little girl and having one on one time with her. I loved how she looked up at me and would smile. I was able to take a crying, hungry baby and make her happy. Then, around 4 months old, my little girl went on strike.
My husband and I decided to go on a vacation to Washington DC and then to New York City. With our baby in tow, all was good. She was fine on the plane, and did well traveling, but she wanted NOTHING to do with nursing! I tried everything from distracting her with the TV to getting my milk to come in before I began to nurse her. She just wasn't having it, and with the fact that we were traveling, I didn't bring my pump! So, I had no other choice than to wean her. I was devastated!!!! I honestly would cry about not being able to nurse her. Of course I was still able to hold her while I fed her but the bonding that I so enjoyed while nursing was done. The switch to the bottle was easy and I never really had pain with weaning because it was gradually done.
 When my second little girl was born, I figured since I was a pro at nursing that it should be no problem to remember the drill. Again, I was wrong. She was a tiny little girl, and with that came a tiny little mouth. She couldn't open her mouth big enough to suck on anything but my nipple, and for those of you who don't know about nursing, that's a BIG no no!! The baby should be sucking on part of your areola too, and my poor little tiny girl just couldn't do it. Even the nipple shields were too big, so, I stuck through it and dealt with the pain. Once again it took 3-4 weeks to nurse comfortably, and was well worth the wait. I nursed my second baby for 6 months and we lasted through a nursing strike too. Luckily I was home and was able to pump while she was on strike. It's sounds silly, but those few days she wanted nothing to do with me were some of the hardest days. I debated stopping breastfeeding and then would come to my senses and stick it out. Her nursing strike only lasted 3 days and then like a fly to light she was nursing again.
.jpg) All in all my nursing experiences were very different from each other. I would never say I'm a pro but from what I went through, I learned a lot. Not just about nursing, but about my self and my babies. So, here are a few tips and tricks that I learned about breastfeeding that really helped me! Feel free to ask any questions you might have and I'll do my best to answer!
All in all my nursing experiences were very different from each other. I would never say I'm a pro but from what I went through, I learned a lot. Not just about nursing, but about my self and my babies. So, here are a few tips and tricks that I learned about breastfeeding that really helped me! Feel free to ask any questions you might have and I'll do my best to answer!
So here I am, on National Breastfeeding Week, to talk about the ins and outs of breastfeeding. It's the natural thing to do and yet so many women out there know nothing about it!
My story starts with, of course, my first child. I was prepared beyond what any first time mother should be when it came to child birth. I had taken Hypnobirthing classes months before I needed to so that I could practice all the techniques. Little did I know I would need to get induced after being a week late and in labor with contractions 4 minutes a part and not dilating. Labor didn't go how I wanted it to go, but it was perfect in the end. My little baby girl was born a whopping 8 pounds 5 ounces and was so perfect! They placed her up on my chest while they cleaned her up and the first thing I did was stick her on my boob. I was on such a natural high that I didn't feel anything! I was just so in love with my little girl.
A few hours later, it was feeding time again. My baby was fussy for the first time since being born and I pulled open my gown and stuck her on. OUCH!!!! What the heck was going on? I pulled her off and repositioned her. OUCH!!!! Am I doing something wrong? My mom came to my side to try and help. It's amazing to me that when you're trying to feed your baby, all modesty goes out the window. There I was on my hospital bed with my gown down to my waist, both boobs exposed, trying to get my nipple in my baby's mouth the right way. Motherhood is so glamorous! My sweet little baby was hungry and all I wanted to do was give her what she wanted, but keep myself from hurting. I had heard over and over from book to book I had read before my baby was born that, 'nursing shouldn't hurt, and if it is hurting, your doing something wrong.' Well, I was in pain, and no matter what I did, nursing hurt! The next day I had the lactation specialist come in and watch how I was nursing. With her help I was able to get my baby to nurse correctly...but it still hurt. So, she stuck her finger in my baby's mouth and came to a conclusion. Baby girl was a chomper. Instead of sucking like a normal baby, she chewed when she ate, therefore, hacking away at my nipple. Devastating news for a new mommy in pain, but she reassured me that if I stuck with it, my little girl would get the hang of it and start to suck instead of chew. Sure enough, she was right! A few days after my little one was born my milk finally came in and thus began the sucking!!! Yay!!!
Now, I'm not saying that once my milk came in that the pain went away. Oh no, the pain lasted a good 3-4 weeks before I was able to nurse without my toes curling in pain. Nursing became a wonderful experience for me. I looked forward to holding my little girl and having one on one time with her. I loved how she looked up at me and would smile. I was able to take a crying, hungry baby and make her happy. Then, around 4 months old, my little girl went on strike.
My husband and I decided to go on a vacation to Washington DC and then to New York City. With our baby in tow, all was good. She was fine on the plane, and did well traveling, but she wanted NOTHING to do with nursing! I tried everything from distracting her with the TV to getting my milk to come in before I began to nurse her. She just wasn't having it, and with the fact that we were traveling, I didn't bring my pump! So, I had no other choice than to wean her. I was devastated!!!! I honestly would cry about not being able to nurse her. Of course I was still able to hold her while I fed her but the bonding that I so enjoyed while nursing was done. The switch to the bottle was easy and I never really had pain with weaning because it was gradually done.
- ALWAYS have the lactation specialist in your hospital come help you! Even with my second child I had the specialist visit my room. Sometimes it costs extra, as some insurances don't cover it, but it's worth every penny to have someone there who's an expert.
- Your own milk is your best friend. After my second baby, my nipples scabbed like crazy and I had tried over and over again to heal them with lanolin. That never worked!!! What did work was air and breast milk! After nursing I would express a little bit of milk and dab it all around my nipple and areola and then let it dry. With in a few days my ouchies were healed and nursing became more comfortable.
- When your milk first comes in you'll get engorged! Seriously my boobs were gigantic! They were also as hard as rocks and I was so uncomfortable. Massage your breasts while your baby is nursing to loosen your milk ducts and to prevent clogged ducts from happening. If you are still uncomfortable after your baby is done nursing, continue to express your milk, either by hand or pump, until it's comfortable. Do not empty your breasts completely. This will only send your body the message to continue to make that much milk the next time.
- Invest in a good pump. I first began using the Medela brand breast pump and I hated it. I felt like it sucked my nipples way to much to the point where the were raw. I really loved the Dr. Brown's Electric Breast Pump. It felt like I was nursing when I used it. It never caused any discomfort!! It did take a little bit longer to pump, but that's the only pump I recommend. It's amazing!
- Lansinoh Breast Pads are the best ones out there! They are a bit more expensive, but I've tried almost every brand and this one never failed!
- The best breastfeeding book is The Nursing Mother's Companion-6th addition. Any question I ever had about nursing was in that book. It helped me feel at ease anytime I was stressing about something not going right.
Monday, July 28, 2014
Summer Squash and Sausage Rigatoni
It's on rainy days, like today, that my need for comfort food dominates my stomach. I also had no desire to go out and shop, so I came up with this recipe using things I already had in my fridge and pantry. It filled the comfort food void, for sure!!! I'll be sure to make it again soon!
 Summer Squash and Sausage Rigatoni
30 minute meal
Serves 6
16 oz. box of Rigatoni
1 Tbs. Extra Virgin Olive Oil
1 Tbs. butter
1/4 c. chopped onion
1 Garlic clove, minced
1/2 lb. mild Italian Sausage
2-3 small yellow summer squash
1 tsp. fresh basil, minced
S&P to taste
Parmesan cheese (optional)
Boil a large pot of water for your pasta. In the meantime, add the olive oil and butter to a sauté pan heated to a medium heat and allow butter to melt. Add your onion to the sauté pan and stir occasionally until the onions just start to turn translucent. Add your sausage to the onions and brown. Next, add in garlic, summer squash, and basil and stir occasionally. Taste for seasoning and add salt and pepper if needed. Once your water is boiling, add in your pasta and cook until preferred doneness (follow the box directions). Drain your pasta and combine the squash and pasta mixture being sure the noodles get coated. Again, taste for seasoning and add salt and pepper if needed. Garnish with more basil (if desired) and/or Parmesan cheese.
Saturday, July 26, 2014
Entryway Before and After
This entryway has been such a process. Before finishing this entryway last night, it's been a blank canvas the whole time. I've just never really had any idea of what I wanted this space to look like! Well, at last, it's finished, and I'm super thrilled about it! Not just because it's finished, but because I think it looks gorgeous. All it needed was a new door, paint, and a few pieces of furniture. Also, I realize Jade is sitting in the corner in one of the pictures...it was too cute not to put in here! See my Master Bedroom/Bath redo here and my Dining Room here


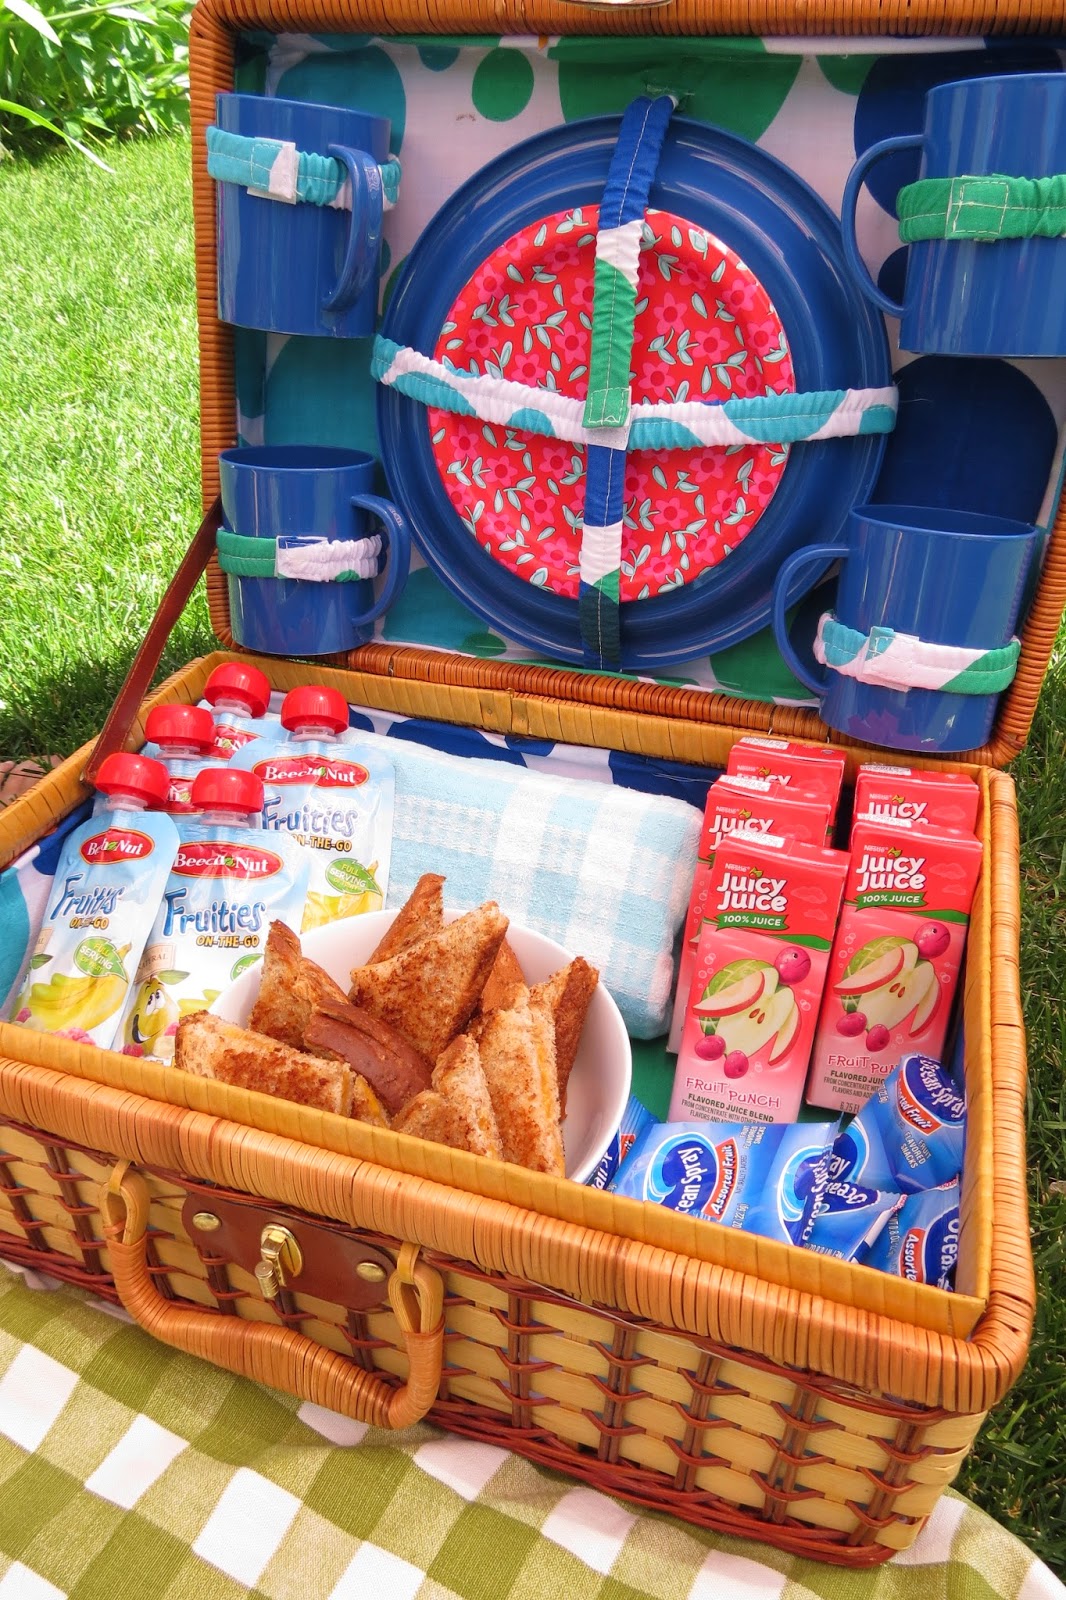
Picnic Basket : Treasures Antique Mall, Springville Utah
Table : My AMAZING husband built it!
Wall color : Valspar Tempered Grey
Coat Hook : Anthropologie (gone now) similar here
Door color : Valspar Magic Mist
Rug : Target (found only in stores)
Friday, July 18, 2014
Tomatillo Ranch Chicken

Ok, ok, I know I've been on a total food kick lately, but I'm going with it. Anything that gets me to cook dinner after a long day watching my little ones is fine by me. This recipe didn't disappoint. It was yummy, looked amazing, and the kids devoured it...as did I!!! I served this with Zataran's Spanish Rice. Enjoy!
Tomatillo Ranch Chicken
This juicy chicken is flavorful and delicious after being marinated, cooked, and smothered in creamy tomatillo ranch dressing!
Serves: 6-8
Ingredients
- 1 cup mayo
- ½ cup buttermilk
- 1 package buttermilk ranch dressing mix
- 2½ teaspoons garlic
- 1 cup cilantro
- 3 tomatillos, husked and chopped
- ½ teaspoon lime juice
- 3-6 boneless skinless chicken breasts
Instructions
- Blend together mayo, buttermilk and next five ingredients. Pour 1 cup of dressing into a large ziplock back. Add chicken breasts. Seal and chill at least 30 minutes or overnight.
- Preheat oven to 375. Discard marinade and place chicken breasts side by side in a shallow baking dish. Bake 20-25 minutes until chicken is cooked through. Top with additional dressing and serve with rice if desired. Enjoy!
Saturday, July 12, 2014
Whatcha eating?
If you're anything like me, Pinterest is your go-to for just about anything you want to know. Step aside Google, cause all of the ladies are going to Pinterest from now on for answers. It's my go-to to find new recipes for sure, and while I've had hit and misses, I've also had some really great success. So today I'm sharing some of my favorites from Pinterest. These are not only super easy recipes to follow, but they don't take a lot of time and they are LOVED by my kids(who are not always the easiest to please)!!


If you want more awesome recipes, check out my Tried and True board on Pinterest!!
Tuesday, July 8, 2014
Dining Room Before and After
As many of you know, when we bought our house 5 years ago it was a disaster. Mike and I got a steal of a deal and decided to put in some serious elbow grease and fix up this dump of ours. After months of renovations and blood, sweat, and tears, we finally got it finished! Sorry to say that it took me this long to finally post pictures of our house on this blog of mine, but here we are.
The walls were stripped of their dated wallpaper, the carpet was ripped out, and the railing was thrown out the window. After paint, flooring, and a bit of wall building, I'd say it might be my favorite room in my house. I feel like it just exudes who we are. The colors fit us and I am pleased. Want to see more? Check out our Master Bedroom and Bathroom re-haul HERE!!!


Saturday, July 5, 2014
Deep Cleaning
There's nothing like a deep clean that make me realize just how big my house is. I mean, don't get me wrong, I'm not living in a mansion or anything, but the upkeep always baffles me. I'm the kind of cleaner that moves from one room to the other. So when I got to my kitchen I loaded the dishes, wiped down the counters, swept, and then...I looked under my fridge. Ew!!! Not only did I find a million magnets the kids have hidden under there, but I found wads, piles, and mounds of dirt and dust. I'm talking the size of a real bunny! So, then it hit me. My house is huge! At least, huge enough to feel defeated when cleaning it. On I went cleaning every nook and every baseboard...all because of the space below my fridge. Ugh.
Friday, June 6, 2014
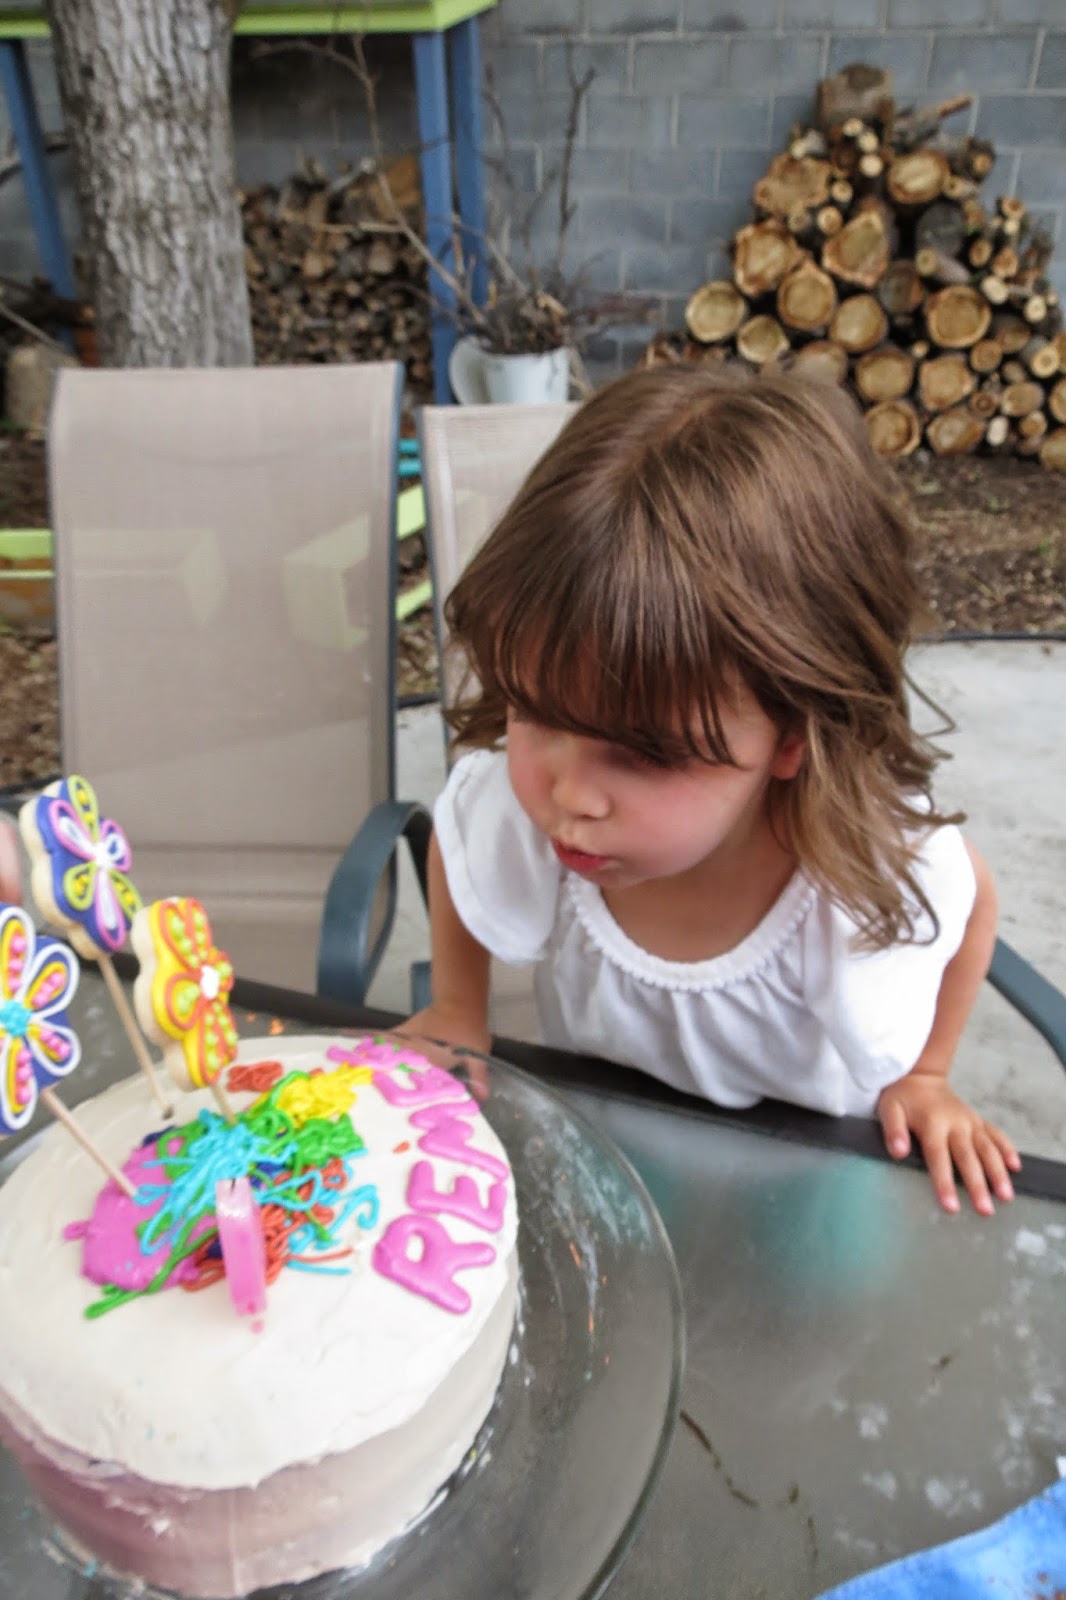
Remee's Garden Party
I think it's pretty obvious by now that I love to throw a party. My little ones birthday parties especially! With past years I've thrown big BBQs for Remee where the family all comes out and we bask in the setting sun. This year, I thought keeping it a bit smaller might be more fun for her. She would just be able to play with her friends without having to dodge all of us annoying adults trying to constantly give her kisses and hugs.
Remee really wanted to play outside with her friends for her birthday, hence the garden theme, so I went along with it. We had a picnic set up with all of Remee's favorite things to eat. Each of the little girls got a flower crown, which sadly they were only thrilled about for 2 minutes before it ended up on the ground. And they also got a bug catching bucket to find snails, lady bugs, worms, and whatever else they could dig for in the dirt.
When it came time to paint their flower pots, all the kids were on board. I found some cute little aprons from the dollar store to help keep their outfits clean and each little girl had a place at the table with their name by a flower pot. I'll be the first to admit the there was more paint on their hands than on their pots. It's all about having fun though right?
Remee opened presents and jumped for joy with each one.
I can't believe that my little lady is 4! The years have past by too fast, and I really love watching her grow up. She's our little sassy pants, and we love her to bits!


Subscribe to:
Posts (Atom)